I like to print out knitting instructions to take with me, and I want my patterns to have everything I need, without having to go online looking for advice on techniques. So I’m learning to draw illustrations of any techniques in my patterns that might be new to a knitter using it.
Here are the instructions for “make one right” (m1R) and “make one left” (m1L) increases I created for the Rugged Softie jacket.

The stitch is added by lifting the strand of yarn between stitches so that the base of the new stitch twists either to the right or to the left.
To make one right, insert the left-hand needle under the strand from the back, then knit through the front of the lifted loop so that the base of the new stitch twists to the right.
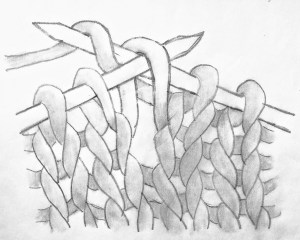
To make one left, insert the left-hand needle under the strand from the front, then knit through the back of the lifted loop so that the base of the new stitch twists to the left.
I hope they make sense!
